Rear view of the system of Dell PowerEdge R550
2023-06-09
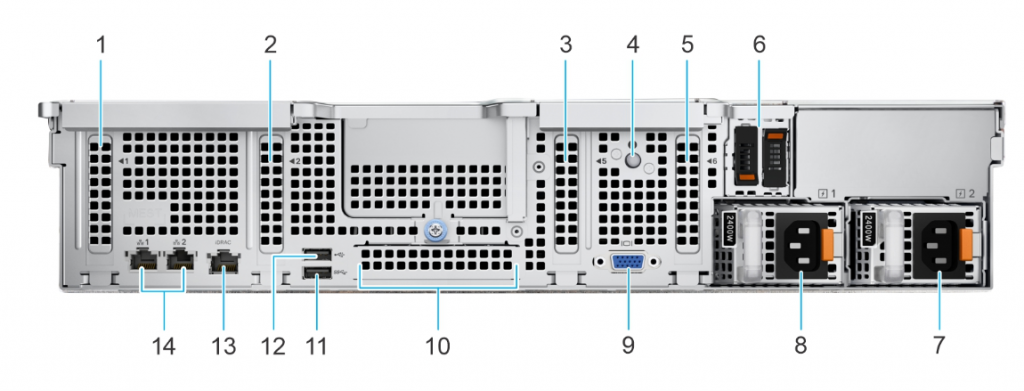
Do you know the rear view of the system of Dell PowerEdge R550? Here we provide you with the rear view of the system overview of the Dell EMC PowerEdge R550. We will introduce you in detail in the form of pictures and tables. After reading this article,you will have a whole hearted understanding of the Dell EMC PowerEdge R550.
Rear view of the system of Dell PowerEdge R550
| ITEM | PORTS, PANELS, OR SLOTS | ICON | DESCRIPTION |
| 1 | PCIe expansion card slot 1 | N/A | Enables you to connect PCI Express expansion cards. |
| 2 | PCIe expansion card slot 2 | N/A | Enables you to connect PCI Express expansion cards. |
| 3 | PCIe expansion card slot 5 | N/A | Enables you to connect PCI Express expansion cards. |
| 4 | System identification button |  |
Press the system ID button:
|
| 5 | PCIe expansion card slot 6 | N/A | Enables you to connect PCI Express expansion cards. |
| 6 | BOSS S2 module | N/A | Enables you to connect BOSS S2 module. |
| 7 | Power supply unit (PSU 2) |  |
Indicates the PSU 2. |
| 8 | Power supply unit (PSU 1) | Indicates the PSU 1. | |
| 9 | VGA port |  |
Enables you to connect a display device to the system. |
| 10 | OCP NIC port (optional) | N/A | This port supports OCP 3.0. The NIC ports are integrated on the OCP card which is connected to the system board. |
| 11 | USB 3.0 port | This port is USB 3.0-compliant. | |
| 12 | USB 2.0 port |  |
This port is USB 2.0-compliant. |
| 13 | iDRAC dedicated port |  |
Enables you to remotely access iDRAC. |
| 14 | NIC ports (1, 2) |  |
The NIC ports are embedded on the LOM card that is connected to the system board to provide network connectivity. These NIC ports can also be shared with iDRAC when iDRAC network settings is set to shared mode. |